Thursday, November 5, 2015

Decor Ideas ~ Owl You Want For Your Bedroom

Who says that a room full of owl decor is only for kids? Keeping the overall theme neutral with just some color to pop, having an owl-themed bedroom in minimalist touch is fully possible. Use corresponding pattern that goes with the owl, like forest, or night related (moon, stars), but keep it not too crowded. Hoot! 


This picture collection is not intended as ads (well, except for the one which I made, lol), I simply found them and happen to like them. But in case you need the source, here they are:

Where I find the photos :
1. Owl Lit Up Lamp
2. Owl Bedcover
3. Owl Printable Wall Art
4. Owl Eye Mask
5. Owl Rug
6. Owl Switch Cover

Monday, October 26, 2015

DIY Easy Owl Plushies ~ With Free Pattern

Make your own plush! To make this, you really don't need a fancy sewing skill. Basic sewing skill, some cutting, and glue gun will finish the job. If you're feeling fancy, you can sew the eyes and wings instead of just gluing them. It's up to you! Choose the color you like, and create your very own fluffy friend. They will make a lovely decoration, toy, or gift.


I'm using velboa fabric for the body (faux fur, usually used for dolls) and felt fabric for the attachments. But you can use whatever fabric you like. However, if you choose to glue the attachments, it will be better to use stiffer kind of fabric.

For the pattern, well.. I actually just made a doodle of it on a piece of drawing paper, like you can see below


So, here I made you the printable version! I made the pattern to fit 8.5" x 11" paper, but you can easily enlarge them to size that you like.


You only need to sew the body, turn it inside out, stuff them, and close stitch! Them grab a glue gun and finish the rest.

Monday, October 19, 2015

Free Printable Thank You Tags

Holiday Season is near! Whether it's for holiday events, birthday events, or anything that involves gifts, it's always nice to have little notes to attach on those gifts, right? Since we don't always have all the time in the world to create our own DIY's, here's a free printables thank you tags for you! Go check it out:


Simply cut, and ready to use! Like it? There's a Halloween Version of these tags, you can go check my Etsy shop. Hope you'll love it!


Sunday, July 19, 2015

Propagating Plants (Basil & Mint) - So Easy and They Will Make Some Great Gifts!

Propagating plants is, when you grow a new plants from leaf, root cuttings, basically parts of the parent plant. When you grow plants from cuttings, they will have the same qualities as their parent plan, unlike when you grow from seeds. 

So far I've tried propagating basil and mint, they root quite easily. I accidentally left some zinnia flower cuttings in water vase for a couple of weeks and they root too! Potato, sweet potato, and ginger are also among those which are easy to grow. Shallots are easy too, they can even root when you keep them in a fridge!

Basically, you just need to cut some of the plants you want to grow, reduce some leaves, and put them in water. In several days to week, they will start developing roots. Sometimes they don't root, so keep several cuttings just in case.

mint cuttings

So, when your plants are getting too bushy, why not prune them a bit and grow them back? They will be a great souvenirs for guests or friends coming over to your house.

 left : mint; right : basil cuttings ~ can you see those tiny roots?


Next step? Wrap them up! Gather your craft supplies.


You don't even need expensive container for it, just wrap them nicely and you're done. You can use fabric stickers, fabric, ribbons, lace, colored paper, or even doilies. 


Tuesday, July 7, 2015

DIY Heating Pack

Heating pack is kinda must-have item nearby, don't you agree? They are very easy to make yet very versatile. Even if you're not experience winter, heating pack is very useful as pain reliever or for tense muscle.

What you need to make one (or some) :


1. Fabric scraps - You can use fabric scraps that you like, but better stick with natural fiber, instead of synthetic

2. Raw rice (or you can use dried corn, flaxseed, cherry pits)

3. Essential oil of your choice

4. Zigzag scissors, funnel (optional)

And, the good thing is, you can make it any size you like! Unlike sewing dresses, we can get away without pattern easily. I'll give you some example on ways to sew the pack :  


1. Zig zag heating pack


This is one of the easiest way to sew this, all you gotta do is :

1. Sew straight stitches in U shape

2. Fill with scented rice

3. Sew it closed

4. Snip the edges with zigzag scissors

Done! Easy right? I believe you can make it without even seeing the instructions.


2. Single Heating Pack
You don't need a zigzag scissors for this one. It's a little bit more complicated, but still easy.
 

1. Sew straight stitches in U shape (but this time flip the fabric first, so you're sewing on the inside part)

2. Reverse it, then Fill with scented rice

3. Fold the top inside, secure with pins, and sew it closed


3. Long Wrap Heating Pack
It is very convenient, because you can wrap it over the aching body parts. You can make it longer and add velcro if you want a secure wrap.


The Result


To heat it, simply pop it into microwave for 1-2 minutes. I usually put a bowl of water together to prevent the rice from burning. (But don't soak the pack, it's gonna get cooked). Happy sewing!


Wednesday, June 17, 2015

How to Combat Flu Symptoms

The best way to combat a disease is as early as possible! When you feel those flu symptoms: sore throat, fatigue, heavy head, .. Immediately take action to get healthy again! When flu has got a grip on you, you can still do these ways to speed up your recovery.

Drink Plenty of Fluids
I know, this might sound boring. Like everybody know this already. Drink warm water to soothe the throat. You don’t have to limit yourself with just mineral water, gulp down variety of fluids to make it more enjoyable, for example :
  • herbal tea ~ you can also add squeeze of lemon juice and some honey
  • coconut water ~ a natural isotonic drink, it's loaded with natural goodness
  • infused water ~ try infusing with vitamin C rich fruit like lemon, kiwi, or strawberries
  • juices or green smoothies
Fix Your Diet
Getting proper nutritional intake is your key to increasing body immunity. Supplements will do, but they’re really just a shortcut, try stuffing yourself with the real goodness! Eat colorful food (and I don't mean candy here) variety of vegetables, fruit, nuts, and lean meat. Keep simple sugar out of the menu for a while. Here's some food that are good for flu recovery
  • Hot Vegetable or Chicken Soup
  • Fruits ~ Avocado, apples, lemon, oranges, and others
  • Vegetables ~ carrot, tomatoes, spinach, and others
  • Salmon, mushrooms, chicken meat
  • Spices ~ Garlic (have antiviral quality), ginger (anti-inflammatory), chili (increase metabolism and relieve your nose)
  • Yogurt, they're delicious and good for you.

Exercise!
It might seem lazier than ever to get some exercise when you’re feeling low, but trust me, this is necessary. Breaking some sweat will increase your body immunity and makes you feel better. You don’t need heavy exercise, doing some 15-20 minutes of jogging will do. At the very least, force yourself out from the bed and do some stretching.

Get Enough Rest

Sleep, sleep, sleep. Your body recovers while you sleep. So get enough of them, and try to sleep earlier. Sleeping a lot won't be so helpful if your sleeping clock is messed up. For example : sleeping all day and waking up all night. Not so good. But if you can't help it, at least try to get some quality sleep.
Cleaning Up!
The last thing that you want after you healed up is, caught up by the virus sticking in dirty environment. So, always remember to clean up, especially after you recover from sickness. Things you might want to do are :
  • Change your bed sheet. 
  • Heat your pillows by drying them outside under the sun or using hair dryer to kill virus.
  • Replace your towel.
  • And clean your toothbrush! You can clean it as simple as using mouthwash to soak it.
  • Promote air circulation in your house, open your windows, let sunlight comes in.
  • Clean your car! If you’re the driver, clean your steering wheel.
  • Another thing? Your gadgets. You need to clean them regularly, actually.
 And watch something funny. Reducing stress will improve your body immunity. Hope those helps!

Tuesday, June 2, 2015

Easy Marshmallow Ice Cream with Chopped Dark Chocolate

I have big fondness of quick and easy desserts. Specially ice cream! I usually use 3 basic ingredients: milk, cream, sugar. Then, we can experiment with flavor. Yay! Still, cleaning the dishes is actually what takes lots of effort. If I could have superpower at home, I would want one that can wash the dish in a blink of an eye, and one that can levitate things! Why? So I can levitate everything in my room when I’m doing the sweeping and moping. Life gonna be much easier lol.

Custard based ice cream does have a more luscious texture, thanks to the eggs in it. But since tempering the eggs are extra effort (lazy mode me), I eliminate the eggs. I don’t add extra thickener too (for example: corn flour). Even so, because I’m using ice cream bowl to churn it, the result is still smooth, yummy ice cream. The minus point? This recipe tends to melt faster and freeze harder. But that’s okay, they wouldn’t last so long in the fridge anyways :D.

Don’t we love those freshly toasted marshmallow?

Add some dark chocolate, chopped roughly or finely depending on your taste, for your ice cream. Remember to add them when your batter has form soft ice cream. Sorry no picture of progress! I really forgot because it’s such a mess in the kitchen. I’m using kitchen aid ice cream attachment bowl. Well.. since I don’t have the mixer yet, I’m churning it manually! If you already have the mixer, using this bowl would be great.


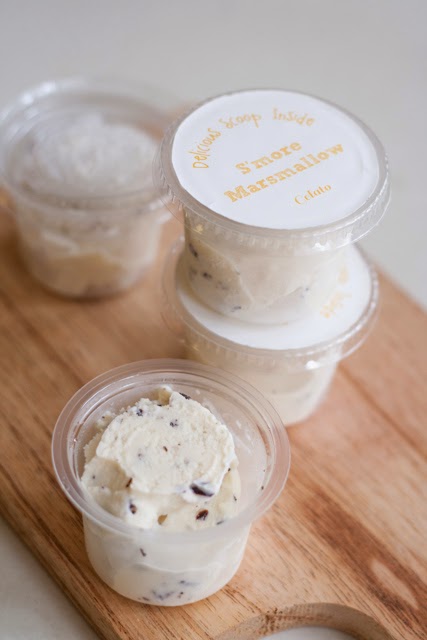
This time I pour them in small cups and label them (It’s really a fun thing to do) and share them! Next time I’m thinking about topping this ice cream with freshly toasted marshmallow. Enjoy!


Recipe : Easy Marshmallow Ice Cream with Chopped Dark Chocolate

Ingredients
100 gr Marshmallows (or more if you like it)
1 cup Full cream milk
1 cup Heavy whipping cream
1 Tbsp Sugar syrup (adjust your sweetness preference)
Dark chocolate bar – as many as you like

Steps
1.   Toast your marshmallows. Be careful not to burn it. Meanwhile, pour together milk, cream, and sugar syrup in a blender (I’m using freshly opened milk and cream so I don’t cook it. If you concern about germs, you can simmer them before putting them in blender)
2.   When your marshmallows are brown and beautiful, mix them in the blender. Blend them good.
3.    Churn them in ice cream machine. Chop your chocolate. When the batter is forming soft ice cream, pour the chopped chocolate in.
4.     Enjoy them as soft ice cream or put them in freezer for harder consistency.

*for sugar syrup, boil together 1 part sugar with 1 part water, cool and store them in airtight bottle in the fridge.